Arrow Fat Left Icon Arrow Fat Right Icon Arrow Right Icon Cart Icon Close Circle Icon Expand Arrows Icon Facebook Icon Instagram Icon Pinterest Icon Hamburger Icon Information Icon Down Arrow Icon Mail Icon Mini Cart Icon Person Icon Ruler Icon Search Icon Shirt Icon Triangle Icon Bag Icon Play Video

Jo's Blog

Let's Make together! February 4th, 2022 Instagram LIVE @ 7:00 MST

It is no secret that I LOOOOVE Valentine's Day! I love pink, hearts and all things chocolate, now that is my kind of holiday! I made this cute Valentine's bouquet and I would love to teach you how to make it too!

Join me on February 4, at 7:00 MST on my instagram for a LIVE tutorial. 

Link to my instagram: Jo Gick (@ohsojo_) • Instagram photos and videos

Here are the supplies you will need to make this fun bouquet with me.


Supplies:

- Crayola Model Magic (Red, Pink, White)

Lollipop Sticks  

Triple thick glaze

- Striped Pot (found in the dollar spot at Target)

- Styrofoam dome (found at craft store) 

- Knife cutter

- Paint brush

Extras

-Heart Cookie Cutters

- Diamond Dust

- Crinkle Paper gift filler

I CAN'T WAIT TO MAKE WITH YOU!!!!

XO, JO

Continue reading

The Perfect Desk for any Creative!

The Perfect Desk for any Creative!

I teamed up with my friends at Formica to create a Desk space to create all my fun products. The opinions in this post are my own and may include affiliate links.


When I decided to take a break from my career as an interior designer to focus on creating products for my Etsy shop full time, I knew I was going to need to design the perfect space for maximum creativity.

Since I was a little girl, I have loved all things rainbow! So naturally I was going to carry this into the space that was just for me!  A space where I can unleash my creativity and make a mess and close the door until I am ready to create again. 

Approaching this space as a designer was like having myself as a client. How could I make this space the most functional to grow my small business while making it a space that makes me happy at the same time. 

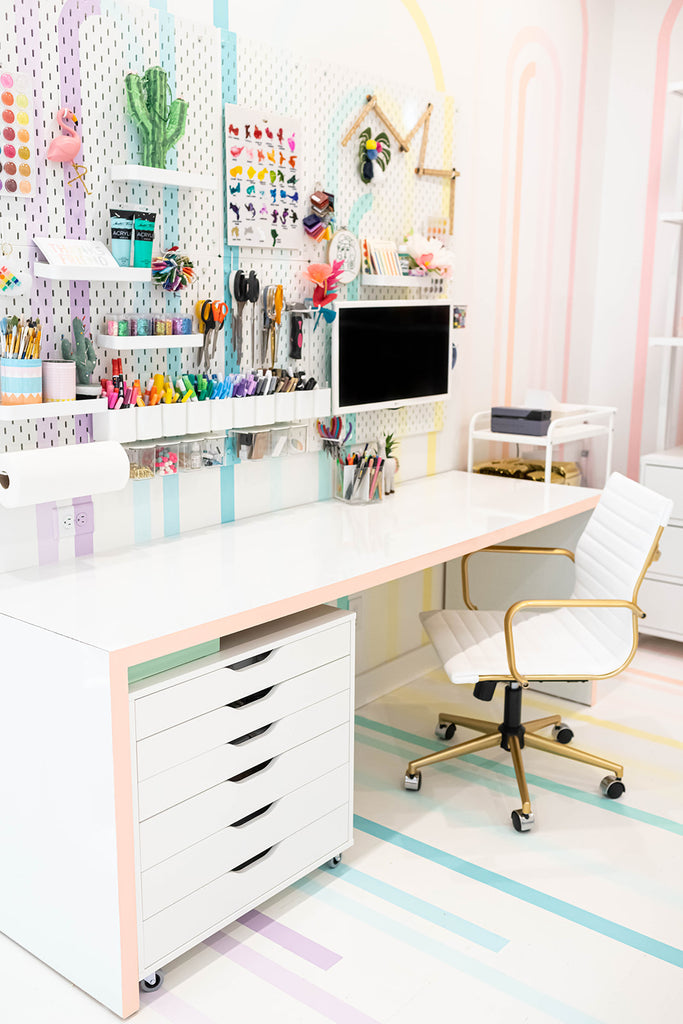
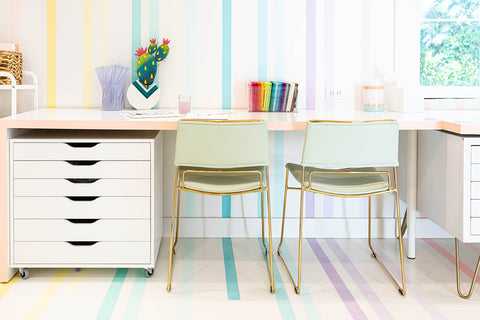
I really think storage of supplies as well as a sprawling work space were at the top of my list. I was on the hunt for a desk surface that would be almost indestructible. 

From experience, I knew that a Formica desk surface was going to be the best bet. I ticked the 3 boxes I needed, durability, light color and affordability. I went to the Formica website and ordered a few free samples of the ones I was interested in. The one I was most excited about and ultimately decided to to with was the ImagiGrid pattern.

When I received the samples I put them to the test. I tried solvents, glues, markers and paints that I use on a regular basis and made sure that I was able to easily clean them off  of the surface of the samples. This was not a decision that I took lightly, I really needed a material that would stand up to all the things I was going to put it through!

The high gloss surface not only makes it easy to clean but also a dry erase writable surface. I think one of the coolest things about the ImagiGrid product is the one inch grid square pattern printed on the Formica laminate. It isn't only a perfect linear pattern to compliment the curvilinear arches on the walls of my space, this makes it so easy to measure stuff when I am cutting fabric, ribbons and measuring random things. 

My husband and I constructed the waterfall desks ourselves out of MDF and adhered the Formica surface with a strong adhesive. This was an affordable way to customize the size and design of the desks to my particular specifications. I chose a waterfall design to hide cords, garbage cans and storage pieces. I accented the desk surface with a colored edge banding to coordinate with my rainbow walls. Needless to say I couldn't be happier with my new Formica desks, not only are they functional but they are beautiful too!
XO, Jo

Continue reading

Be Our Guest!! A Guest Bathroom that is fun and funky!

Be Our Guest!! A Guest Bathroom that is fun and funky!

When we were designing our addition, we wanted to add another bathroom. It ended up being quite a pain to be honest. We had to rip up our entire driveway to put in the the pipes to make it to the main drain, was it worth it? HECK YEA!!
I knew that I wanted the bathroom to be fun, funky, have a lot of texture, pattern and most of all COLOR!
I always like to start with a "LEAD" pattern. What this means is a piece that incorporates all the colors that I want to pull into the room. I fell in love with this wallpaper from Milton and King! The paper is called "from up here", I ordered the sample and when it came in I knew this was it!  I love the colors, the cheeky pattern and of course all the birds. The paper quality was great and it was really easy to install.
Once I had the sample in hand I was able to easily select the rest of the materials for the bathroom. I had my heart set on this amazing cement tile from Lili Cement tiles, I knew it was going to go perfect with the paper. The pattern on the tile is called Tiffany and comes in several colors, you can even customize your own colors which is always a nice option to have. One thing I also love about this tile as a maker is that each piece is hand made. I mean, how cool is that? I decided to go with a simple white subway tile for the shower walls not to take away from the gorgeous tile and to give the eye a rest.
I decided to add a texture to the walls with rectangular panels of caning framed in rectangles. We made the wainscoting of MDF, then added the caning on the wall with spray adhesive, and framed it out with a thin trim. We then painted it with this gorgeous deep blue by Dunn Edwards : Atlantis DE5790
I finished off the bathroom with a mirror from Serena and Lily, Vanity and shelving unit from Anthropologie, Commode by Kholer.
Check back soon to see what other fun things I am working on!
XO,
All photos by: Taylor Piech Photography

Continue reading

A Hallway that will stop you in your tracks!

A Hallway that will stop you in your tracks!

When I was designing our addition, I knew that our hallway would be a big part of the design. I wanted to have a wider, more spacious hallway so it didn't feel like an after thought. The hallway is seen from our main house and it is the main thoroughfare to the addition.
I knew I wanted to do a wallpaper and  Hygge and West is always my first stop. The quality of their paper is top notch and their designs are fashion forward and really make a big impact!
I started with a blank slate and I knew this double hallway needed a bold pattern to balance the rest of the spaces. Look how much potential right?
The Hygge and West quill paper by Coral and Tusk was high on my list. I have been eyeing this paper for quite a while. I had even used the green version in a client's house and I fell in love with it. 
 
I love to play with textures and patterns I knew it would be the perfect backdrop to all the pop of color that I was planning on adding to the space.  Check it out, cute right? 
I had been collecting a bunch of different art prints and I had envisioned doing a mixed art wall on the wallpaper. The pink lights pop off the paper so pretty too and set the stage for all the finishing touches.

One of my favorite moments in the space is this little vignette I created with this butterfly artwork and burl table. This is the first thing you see when you walk in from my garage and it always makes me so happy!

I am still working on so many projects in my addition so stay tuned for more fun stuff soon! Make sure to check out my YouTube with Rebecca Propes to see us installing all the paper.
                                               XO,


Continue reading